Friday, November 15, 2013

My Latest Material Mavens Quilt--Comfort in a Yellow Chair


Our theme of "comfort" this time was intriguing, and the resulting quilts have been, so far, amazing!  This design was my first idea, but before executing it I spent an entire day trying to capture the comfort of family.  That quilt was a disaster, frankly!  So then I returned to my first inspiration.

I sit in this yellow easy chair every day in the late afternoon when I am too tired to do anything else but sit and read.  In the winter, a fire is in the fireplace and I have a mug of hot tea beside me, and a throw in case I get chilly.  Books have afforded me a great deal of comfort and diversion and distraction, ever since the sad days of February, 2011.

To make the central image in the quilt, the yellow chair, I first took a photo of the chair, and then I posterized the image on Photoshop, a technique that makes the shadows and the outline of the chair stand out.  I printed this image, traced it onto yellow batik fabric, and then added in the details of the chair and its shadows with a product called Pentel Fabric Fun, Pastel Dye sticks.  Ironing the shadowing with a hot iron, protected by a sheet of paper, made this coloring permanent.

For the captions under each photo below I'll give some other construction details.


The little mini quilt is a print that most mimics a pieced quilt.  I "quilted" it simply and tacked it
onto the arm of the chair, as I wanted to achieve dimensionality.  The chair is stuffed lightly--a technique called
"trapunto".  I cut a slash in the batting and inserted small pieces of fiber fill, and then I
closed up the slash by hand.
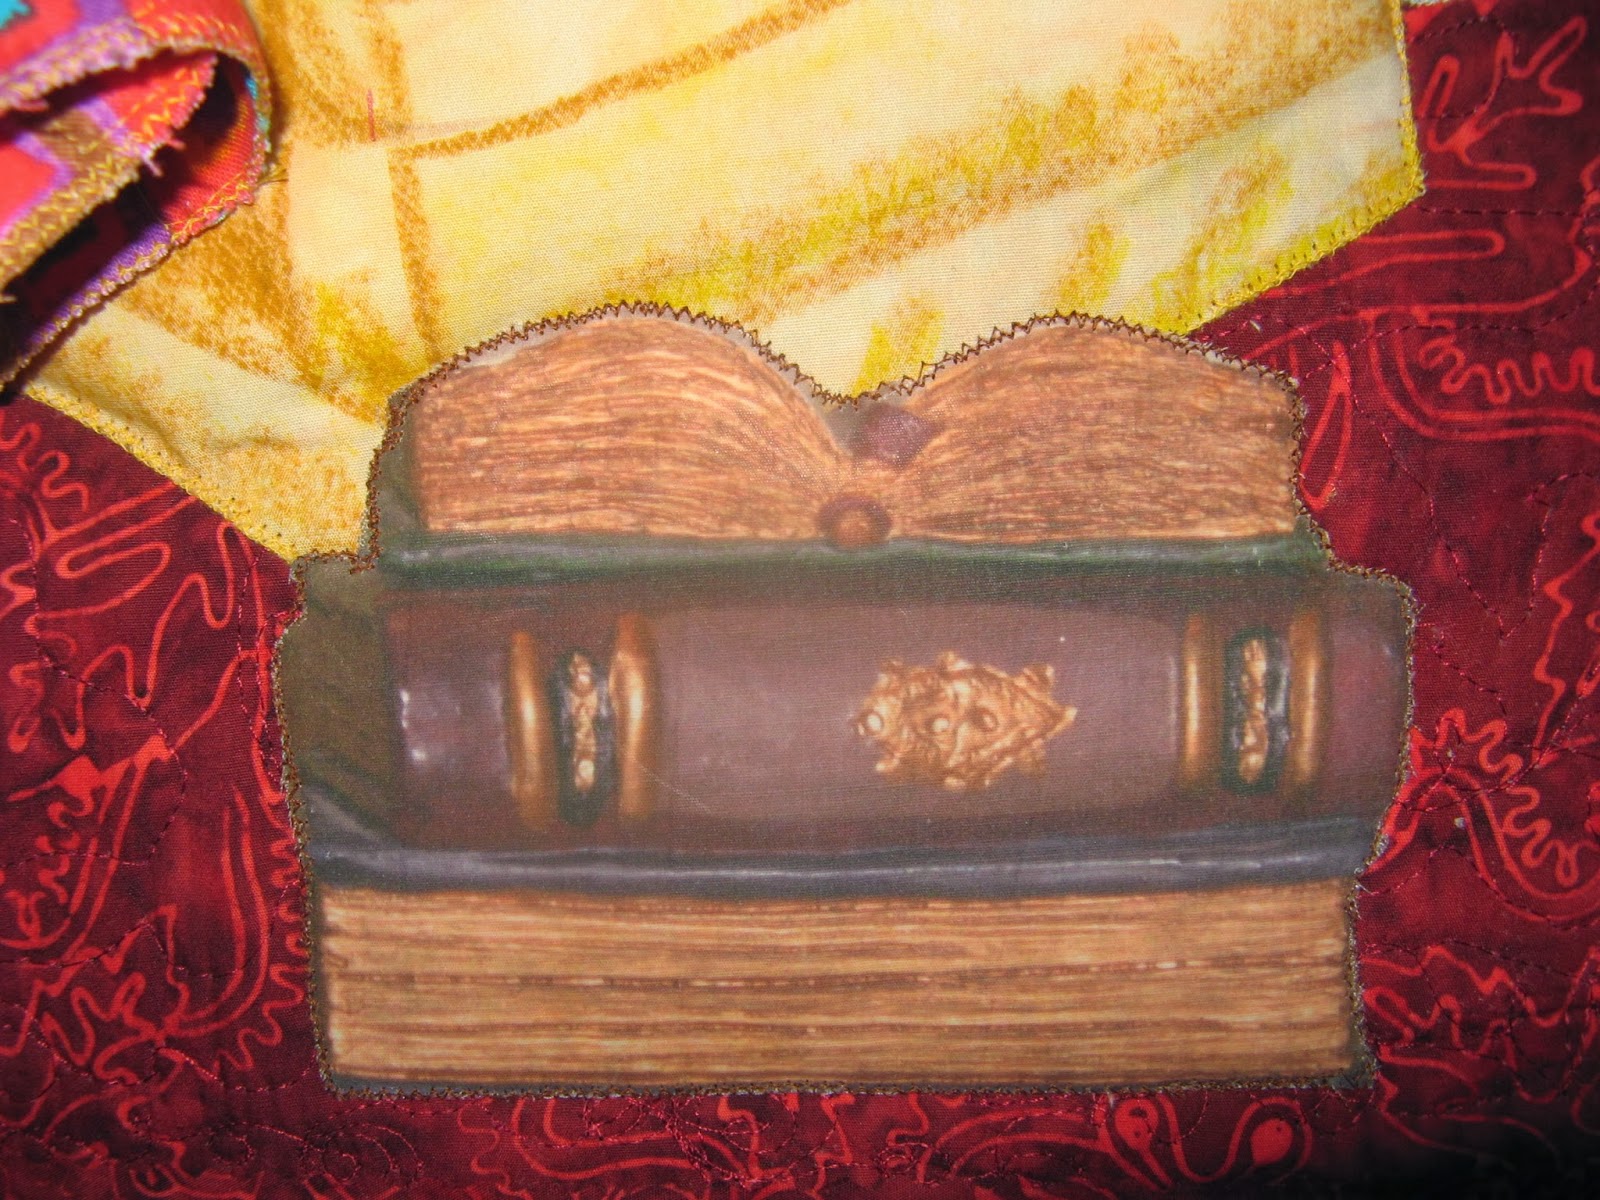
The stack of books was achieved by my photographing a little ceramic box that sits beside my reading chair.
I printed the image onto fabric and then appliqued it to the quilt.

I love all the blue and white Spode china that I have collected!  I drink
coffee every morning and tea most afternoons from one of my Spode mugs.
I have a vast collection of blue and white fabrics; I chose one that
most looked like one of my mugs.  I scanned the fabric, then reduced the image
on Photoshop, and then I printed the image onto white fabric, to make
some new fabric.  Then I cut the mug out from it and added the inside of the mug's lip and the
handle from plain white fabric.


This is the back of the quilt.  I was sorely tempted to use this
beautiful commercial print for my stack of books, but
I was determined to do something from scratch.  Another
idea I had was to use my Aunt Martha's book SPUN BY AN ANGEL
for the book beside my chair, but somehow this image didn't have
the impact I wanted.

If interested, you can read about this book and my aunt on Wikipedia,
at this location:  http://en.wikipedia.org/wiki/Martha_Cheavens
My father is the little boy in the book, set in Mexico, where the family lived
before the Mexican Revolution; my Cheavens grandparents
were missionaries to Mexico.

This distorted image is an attempt to portray in 2-D the 3-D quality
of this quilt, with the stuffed chair and the little quilt that
is simply tacked onto the front.


Sunday, September 15, 2013

Two Geckos--My Latest 12"x12" Quilt for the Material Mavens Blog


Today is the Reveal Day for the Material Mavens internet art quilting blog that is so dear to my heart!  the theme this time was "Green."  As soon as I learned what the theme was, I knew that at long last I could make a lizard quilt.  Lizards of all kinds fascinate me, but dearest to my heart are the little green geckos that so often appear on either our door or window screens.  So I planned to base my quilt on these little lizards.

I found coloring book images of geckos and I traced them onto freezer paper and then cut them out to be patterns.  These I ironed to two different green batiks and cut them out, fusing them to the background.  The background fabric is another batik, black with jungle-like foliage in green and blue.

I decided to quilt this quilt by hand with embroidery stitches, and so I followed the designs in the background.  I beaded both geckos with tiny green beads and used orange ones for their eyes.

The backing for my quilt is a commercial print of lizards in many colors--a fabric I love and will use someday in a large quilt.  Below is a close-up of the quilt and then a view of the back of the quilt.
For the edges, I zig-zag stitched four times around the quilt--twice in black thread, once each in blue and green, using rayon thread for all.


Tuesday, August 6, 2013

A Painted and Stitched Canvas Quilt


This quilt is probably the most unusual quilt I've ever made!  In March I attended a wonderful at Quilting Adventures, under the superlative teacher, Katie Pasquini-Masopust.  The class was relaxing and freeing, as we painted treated canvases, embellished them with cut-out snippets of fabric, and then painted, stamped, and splattered acrylics over the surface of the canvas.

Next we used a "view finder" made from a cut-apart framing mat to find "interesting" areas all across the surface of all of our canvases.  We marked these and then cut them out in squares and rectangles which were a multiple of two.

Once we had all of these little pieces cut out, we reassembled them, using pieces from all of the canvases we had painted, into a design that was pleasing to our eyes, much like putting together a jigsaw puzzle.

When we were happy with how these looked, we sewed the squares and rectangles together using black thread and a zigzag stitch.  A Teflon foot was particularly helpful at this step, as it allowed the machine to move more easily over the rather uneven and occasionally sticky and even rough sections of the quilt.

I came home with three quilts stitched together, and then I used up all the left-over pieces to assemble yet another quilt.  Finally, five months later, I have finished one of the quilts.  It is the last one I made--the one using leftovers.  After sandwiching it with cotton batting and a piece of untreated canvas, I free-motion quilted with black thread, primarily outlining the painted brush strokes.  Then I squared up the quilt.  Finally, I satin-stitched three or four times around the edges of the quilt.

Lastly, I deviated from Katie's method of assembly, in that I decided to use for the frame a pre-stretched artist canvas that measured 12" by 24" instead of assembling a frame by hand. I satin stitched once again around the quilt, attaching it this time to a rectangle of black fabric that measured 6" larger all the way around.  I pulled this backing fabric around on all four sides, tucking it between the frame and the artist's canvas on the back.  Eventually I will staple the fabric securely, but I was eager to photograph it and write this!

A close-up view of the machine quilting

A side view, showing the right edge of the fabric-covered frame

Wednesday, July 24, 2013

My Latest Material Mavens Quilt--Honeycomb


Our theme for the Reveal which was on July 15th was "cell."  This theme was quite a challenge for me, and it took me awhile to decide what to do.  Somehow, some way, perhaps from reading dictionary definitions of the word or searching Google Images, it occurred to be to focus on the cells of a honeycomb.

I first tried to use a stencil a honeycomb design on some silk, but the paint bled through.  I tried to silk screen using the stencil, and the same thing happened.  In addition, the colors I used--yellow silk and orange paint--simply didn't look authentic.

Eventually the design began to evolve--a collage of "bee-related" images.  Thus the final quilt is just that.  For the essential honeycomb I used a copy-right free Google image of a real honeycomb, transferring it to fabric via TAP (Transfer Artist Paper).

At first I included some dimensional red flowers for my dimensional bees, but they dominated the quilt and the necessary honeycomb faded into the background.  Then I decided to use flower prints.  I had some white flowers on black fabric, but couldn't locate black flowers on white (and I was concerned to limit my color palette).  So I decided to hand-stamp with black paint on white fabric.  I made the stamps myself from craft foam, and the resulting hand-stamped fabric became one of my favorite parts of this quilt.

My other favorite aspect are the dimensional bees!  These were thread painted first on fabric backed with stabilizer.  The wing were made of organza, thread painted with gold thread. Then I cut them out and machine stitched them to the quilt.

Finally, I added a bee hive, which I embellished with embroidery stitching.  Embroidered seed stitches became my quilting, along with free motion quilting the black flowers on white fabric.
The background is a commercial fabric that is a subtle honeycomb print.

The back was fashioned from some of my "rejects" from the front.  I included the first verse of the Jimmie Rodger's song "Honeycomb" which ran maddeningly through my head while I was constructing this quilt!

Tuesday, July 16, 2013

Judy Steward = Machine Quilter Extraordinaire!

I just went down to Judy's studio to pick up the quilt that she quilted for me.  I must say she out-did herself this time!  She was happy to admit that many of the unique ways she quilted this quilt were ideas that she got from Rose Hughes' book, DREAM LANDSCAPES, which I had taken to her.

Pictures tell more than words, though, so I will let the photos speak for themselves.  I thought I would wait until the quilt was bound, but I just couldn't stand to wait to share this quilt!  (Incidentally, Rose included a way to face a quilt in her directions in the pattern I had bought; coincidentally, Judy had just watched a DVD about this method of finishing, and she was urging me to try this technique.)

Anyway, here are the photos.  Click to enlarge, and I think you'll see why I am so excited and delighted with Judy's work.  What a treasure she is!


Thursday, July 11, 2013

Saguaro Quilt

Alice's quilt--I made this for my dear friend Marie,
for an "important" birthday she has just had.  Marie and I
share two grandchildren!

I have just completed this wall quilt top, and it is now being free motion quilted by my expert quilter friend Judy Steward.  Since I first met Judy in 1999, she has quilted numerous quilts for me, and I have never been disappointed!

This design is a Rose Hughes design.  Rose was teaching at Quilting Adventures several years ago, and I bought this pattern from her.  I've never before made an art quilt from a pattern.  I thought it would be easy and would go faster than those I dream up from scratch!  I had it in mind all along that it would be a gift for Marie.

No, it wasn't easy.  I've now decided that following another art quilter's design is harder than making one up from scratch!  (Isn't that strange?)  I started at the top and tried to change the sky a lot from the pattern.  Probably it would be helpful for me to attach a picture of Rose's quilt, from the pattern envelope:

Rose Hughes' quilt.  This quilt is photographed
against a black background.  It is NOT bordered in black!
Marie lives in Tucson, where these Saguaro cacti are a protected species of plant life!
I did modify the sky somewhat, chiefly by moving the sun!  Anyway, after "fiddling" for an entire day with trying to change the sky more dramatically, I gave up in disgust and fairly closely duplicated Rose's sky, in terms of the colors of the clouds.

I did well finding fabrics for the big mountain and the two foothills below it.  But then, again, I tried to be "creative" and changed up not only the colors of the hills and the foreground, but even added in two extra hills.  The result was that in doing this, the path just didn't look right, so I removed it.

Then, after all pieces had been cut out and pinned to my design wall, I was still dissatisfied, and so I made these changes:

1.  I cut out new cacti, in brighter greens--my first greens were too muted and got lost in the background.
2.  I eliminated the two extra hills.
3.  I bought two fat quarters batiks for the dark red hill and the red-violet one above it.
4.  I bought some gold batik that more closely replicated the colors in Rose's foreground.
5.  Most importantly, I restored the footpath, but I made the one at the bottom a bit narrower than Rose's pattern.

After the quilt is quilted, I will add some need white "dangles" for the flowers on the two cacti.  I might or might not add a bit of hand embroidery; Rose has much beading and embroidery on hers.  But perhaps Judy's quilting will be sufficient and I won't add anything.

Judy and I discussed how to bind the quilt.  She demonstrated a "facing" type binding, that interestingly, quilt designer Rose illustrated in the pattern.  Most definitely I will do this, since any other sort of binding would likely be distracting.  Incidentally, there are other directions on the web for how to face a quilt--this one was just the first one I found, and it most nearly duplicated what Rose demonstrated in her pattern directions.

When the quilt is quilted, I will add another photo to this post!

Wednesday, May 15, 2013

Sunrise Over the Urban Canyon

Today is another Reveal Day for our Material Mavens group.  The theme this time was Canyon.  I had thought, of course, about depicting a literal canyon.  I've traveled so much in the West, have been fortunate to have visited the Grand Canyon several times, but also other national parks in Utah with stunning and unique canyons.  I have some spectacular photos from these travels.  But somehow, none of them seemed to inspire me.

I WAS inspired by a Google image of a "slot canyon," but when I wrote to the photographer for permission to use his image, he never replied.

But then the words "urban canyon" hit me.  I immediately began sketching some ideas.  Once I had a rough sketch that I liked, I drew it off more carefully on graph paper.  Then I used tracing paper to trace templates.

My first version didn't work.  Husband Bob when he looked at it couldn't make head nor tail of it.  The problem was that I had use some fabrics from my stash and others that I had purchased just for this purpose that had window-like designs for the buildings.  Really great fabrics!  But they were too busy and colorful.  As I said on the MM blog, "he couldn't see the forest for the trees."

So I started over with plainer fabrics.  I decided to focus on black, brown, blue, and gray.  I had recently learned that objects at a distance in a landscape are appear paler and more gray than those in the foreground, so my grays were reserved for the distant buildings, as well as for the street, the sidewalk, and the center stripe.

I had fun with using various decorative stitches to secure the buildings to the background, a gorgeous batik that reminded me of a sunset or sunrise.  I had first fused the buildings down with Wonder Under to a wonderful batik fabric that reminded me of a sunrise, and used the decorative stitching for my "quilting."  Too, I wanted to emphasize how you can see both fronts and sides of some of the buildings, so I used couching to emphasize this line of demarcation.

I used a Sue Benner technique, learned in a class taken last fall, to finish the edges.  I chose six different colors of threads and zigzagged along the edges and left "tails" of the threads at every corner.  For the backing, I used a cityscape fabric that I have long treasured.  It was bought in the late 90s and depicts the skylines of D.C., NYC, and Seattle.  I chose the latter skyline for this backing.

As always, click to see enlargements of the photos.
the Seattle city-scape that forms the back

the quilt showing the tails of thread


Sunday, April 14, 2013

Working Neat/Working Messy

I have always wished I were one of those people who could, when quilting, "work neat."  I seem incapable of doing this!  Whatever project I'm working on, and especially if I have two or three going at the same time, my studio soon looks as if a tornado had hit it!

Yesterday I straightened up my studio, since I had company coming over for dinner.  I felt sure some of the women would ask to see my latest quilts, and I was embarrassed by the chaos.  So I straightened it up at least to the point that someone coming in wouldn't wonder about that possible tornado! (As it turned out, only two women came in, and these I invited!)

So while it is in decent shape, I'll enclose a few photos!

I actually started out in the hall.  I reorganized my bookshelves, which had gotten to be truly chaotic. On the shelves you can see are my quilting books, one shelf for traditional and one for art quilts, plus my quilting magazines, and miscellaneous how-to-do books from drawing and painting to crocheting and knitting, and lots of decorating books, as well, from the days planning this house.  (We've lived here four years now.)

Now we move into my studio.
When you walk in, you can see my cutting table in the center of the room--an Ikea portable kitchen cabinet that
has drawers and shelves in the side you can't see.  In the corner of the room is my computer, where
I am right now!  

On the left wall is my Bernina sewing machine and one of my Elfa drawer
"towers" which houses white and off-white fabrics, as well, in easy reach from the machine,
various necessities such as bobbins, scissors, pins, etc.

To the right of the door I have just put my radio and CD player in its
new home--on a never-used "TV tray".  This used to be on the shelves in the
hall, but I never liked it there.  Its cords were unsightly, stretching to the nearest
outlet--an eyesore that could be seen from the dining room, next door
to my studio.
Here's a better view of my design wall.  I made it from insulation panels, nailed to the wall and covered with flannel.
It goes from right above the electrical outlet to the ceiling--10' ceiling in here.  My 10 Material Maven
quilts are here most of the time, though sometimes covered with more flannel, if
I need to pin a biggish quilt on the wall!

My ironing board is sort of moved here and there in the room.  Here
is is in front of a second-hand dresser I bought here in town, made of blonde wood 50ish
furniture that, in this case, in incredibly sturdy and well-made.  What a buy!
It has a total of 8 drawers, which hold all manner of things from art supplies, to
grandkids' crafting stuff, to the CDs onto which I once saved all my photos, and on and on and on!

Beside the door and on the back wall of the room are my Elfa drawers
that hold my stash--or part of it!  These drawers are loosely organized by colors and/or by types
of fabric.   My threads are on top, as you can see.  On my cutting table I laid on the "painted, cut, and stitched canvas"
quilt that I have started since getting home from Quilting Adventures.  I am eager
to finish all four of these, but baby quilts keep taking precedence!


Wednesday, March 20, 2013

With Apologies to Robert Frost!


This bush of "knock out" pink roses was covered with blooms!
Our bushes of red knock outs aren't blooming yet.


Today is the first day of spring!  As I walked this morning, camera in my pocket, I snapped the few signs of spring that showed themselves.  Also as I walked, I thought of Robert Frost's poem "Stopping by Woods on a Snowy Evening."  As I recited it to myself, I thought:  I could parody this poem!  Well, yes, but wow, is his rhyme scheme hard to pull off!

Despite the challenge,  I began the parody in my head while finishing my walk, but completed and tweaked it on the computer.  Here it is, and the snapshots that inspired it are above and below:


Whose yards these are I think I know.
Their owners are at work, although
They wouldn’t mind me stopping here
To snap these photos, even though

It’s early yet, so rather queer
To capture spring when it’s just here.
Most grass is brown and still looks dead,
But as I walk I see some dear,

Sweet blooms of yellow, pink, and red,
And even blue.  I need to spread
The news, to all make clear
Spring’s come!  This yellow, blue, and red

This pink—show that spring’s not near
But rather on this day, it’s here!
I go inside to sew and cheer:
Hurrah!   Truly spring is here!

When I passed by this tree yesterday, the scent of its blossoms
was heavenly!  Notice the blue, blue, cloudless, Texas
sky!

Petunias do well in Texas in the spring, but once summer
gets here--they usually don't survive.

This yellow "knock out" rose is the first to bloom on its bush.

From my computer desk, I can see this lovely
tree across the street.

Look closely!  These are the first blue bonnets I've seen so far.  Soon this field and
others will be covered!

My neighbor told me yesterday that these dianthus came up from
seed from last year's plants.  Though supposedly annuals,
dianthus survive here, after being cut back in the fall, to
bloom again the next spring.

Friday, March 15, 2013

The Lost Art of Letter Writing


This is my latest quilt for the Material Mavens art quilting group that I am in.  Today was our reveal day, and our theme for this time was Communications.  I chose to focus on letters written from my parents to my Aunt Sallie and my paternal grandmother.  They were written during the 1930s, when Daddy was looking for a job on a newspaper and then from Mother, after they married.  I also included a picture from that era.

For the crazy quilt background for the snippets of letters and envelopes, I fused some of Mother's handkerchiefs to pink and blue fabrics, as well as some old lace of hers.  Then I cut them into crazy quilt shapes and sewed them together.  I embellished the background with machine embroidery stitches on some of the seam lines.  Then I fused down and appliqued the letter snippets and a few envelopes, as well as the photo.

These wonderful letters were given to me by my cousin David, who sorted through his mother's letters after she died and put them into categories according to which sibling the letters were from.  He then put them into a notebook and gave the notebook to the various families.  Thanks to David!

The back of the quilt is also pictured above.  The fabrics that are under the hankies can better be seen on the backing.  I used the pink fabric that reminds me of Mother's Pink Tower china (which she willed to my niece Laura!), and the blue fabric with blue bonnets and other flowers makes me think of Daddy, who loved gardening and flowers so much.  I also used some 1930s era, genuine, feed sack fabrics, again in the signature colors of pink and blue.  

The close-up allows one to read some of the choicer quotations from my parents.  Daddy is often depressed over the financial situation in the country and for him personally, unable at first to find a newspaper job.  He relates to his sister Sallie how a new job soon ended, and he tells her, "Don't tell Mom!"  (Some things never change!)  And Mother, a new bride, lists for her sister-in-law many of the delights of marriage, including trying new recipes.  She projects into the future and imagines herself as a granny whose grandchildren speak in "dulcet tones" about the hours spend in Grandmother's kitchen!

This latter statement is poignant for me.  Her first granddaughter, our beloved daughter Mary Katherine, who is no longer with us, DID indeed spend hours in her kitchen.  She loved especially to make cookies and candy with her grandmother, and I have recipes in her hand-writing, copied down from some of my mother's.  

Tuesday, January 15, 2013

Interwoven Lives--My Latest Art Quilt


Today is Reveal Day in my Internet art quilting group, The Material Mavens.  The theme this time was Interwoven.  I decided to print the names of all our members on silk ribbons and then weave them together, such that all the names were visible.  I put a fusible product on the back of each ribbon, after it was printed, and then worked on the weaving.  This was quite a challenge!  I had printed the names at either the right or left sides or in the middle, thinking then it would make the weaving easier.  Not so!  Despite that, getting the ribbons right, without obscuring any name took me several hours.

Once I finally had a design that suited me, I carefully moved each ribbon onto the turquoise silk background fabric.  Once all the ribbons were in place, I fused down the ribbons.  The background fabric is recycled silk from a second hand store's collection of blouses!  I bought quite a few 100% silk blouses and now love using old fabric!

This quilt as depicted here is actually slightly changed from the first one I posed!  I wasn't happy with the original binding, and so I substituted another. I actually used a tie-belt from a lovely silk dress my mother had made for me some 20 or 30 years ago.  The fabric is lovely and the dress is perfect still, but unfortunately I have outgrown it!  I'm sure this fabric will reappear in a quilt someday--its lovely flower and butterfly pattern doesn't show here, but I do like the slight contrast with the background and the way the binding defines the edges.

Another change in this quilt is some added hand quilting.  At first I simply "echo quilted" around the weaving, but the corners and edges looked too empty.  So I hand-quilted circles, some alone and some over-lapping.

You can see all the Interwoven quilts--a superb group this time!--on our blog, which can be found at http://thematerialmavens.blogspot.com/